
You’ve heard about Notion and you’re wondering how to get started well? You created an account but don’t know where to begin? This guide is made for you.
I’ll guide you step by step to discover Notion. From creating your account to your first pages and databases.
Step 1: Create Your Notion Account
Go to Notion website and click “Try Notion for free”. You can sign up with Google, Apple, Microsoft, or your email.
The free plan is perfect to start. Unlimited pages and blocks, up to 10 guests, sync across all your devices. Warning, you’ll be limited on the number of blocks in collaborative mode. Some features will be inaccessible. But it’s already very good!
Download the desktop app (Windows, Mac) or the mobile app (iOS, Android). Or use Notion directly in your browser.
Step 2: Discover the Interface
The sidebar : your navigation menu on the left. With your favorites, private pages, shared pages, and trash.
The workspace : all your pages and their organization. You can have multiple workspaces for the same account.
Everything in Notion is based on blocks. Paragraph, heading, list, image, table, database…
Databases are the most powerful blocks. A set of data in tables, kanban, or calendar. Each row can be opened as a page.
Step 3: Create Your First Page
Click on + New page in your sidebar. Or use Cmd/Ctrl + N.
Before adding content, personalize your page with an icon and a cover image.
Step 4: Understand Blocks
In Notion, everything is a block. Type “/” to see all available types.
Essential blocks:
- text, h1, h2, h3: paragraph and headings
- bulleted, numbered, to-do lists
- toggle: to hide content
- callout: colored block with icon
- quote, divider
- image, file, video, audio
- database

Format text:
- **text** or Cmd/Ctrl + B for bold
- *text* or Cmd/Ctrl + I for italic
- ~~text~~ or Cmd/Ctrl + Shift + S for
strikethrough - Also change text or background color
Tip: transform a block into another type via the 6-dot menu on the left.
Step 5: Organize Your Pages
Create subpages : type /page in a page. Or drag and drop pages in your sidebar.
Use favorites : click the star at the top right. The page goes up to “Favorites” for quick access.
Step 6: Your First Database
Databases are Notion’s real power. What differentiates Notion from a simple note-taking tool.
Create a simple to-do list:
- Create a database
- Give it a name (e.g., “My tasks”)
- Keep the “Name” property
- Click “+” on the right to add properties.
For example:
Status (Status type): To do, In progress, Done
Date (Date type) for deadline
Priority (Select type): High, Medium, Low
Category (Select type): Personal, Work, Training… - Click “+ new page” to add your tasks
Different views : a database can display in multiple forms. Click “+ Add a view”: table, kanban, calendar…
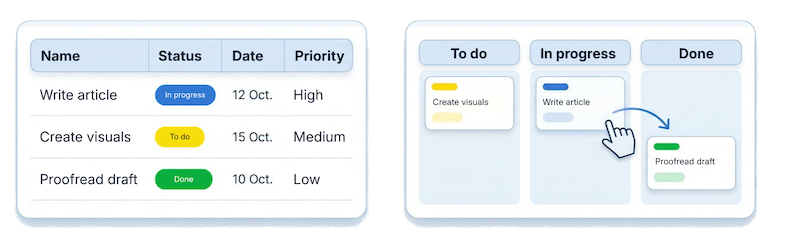
Powerful tip : in kanban view, drag your cards from one column to another. The status changes automatically! In calendar, moving a card also changes the date.
Step 7: Essential Shortcuts
Navigation:
- Cmd/Ctrl + P: quick search
- Cmd/Ctrl + N: new page
Editing:
- Cmd/Ctrl + B: bold
- Cmd/Ctrl + I: italic
- Cmd/Ctrl + K: create a link
- >␣: toggle
- -␣: bulleted list
- #␣, ##␣, ###␣: heading 1, 2, 3
Blocks:
- /: block menu
- Cmd/Ctrl + D: duplicate block
→ To discover more, visit my freebies. I’ve gathered shortcuts in a template!
Best Practices to Start Well
Start by closing Notion!
It may seem paradoxical but it’s fundamental. Before building, think about what you want to create. Define the data to group and interconnect. You’ll avoid hitting the wall.
Start simple: don’t try to organize everything perfectly from the start. Start with a simple to-do list. Use it for a week. Add features progressively. The classic mistake? Wanting to build everything at once.
Use search: with Cmd/Ctrl + P, you can search for any page or text. It’s ultra-powerful! You don’t need perfect organization if you master search.
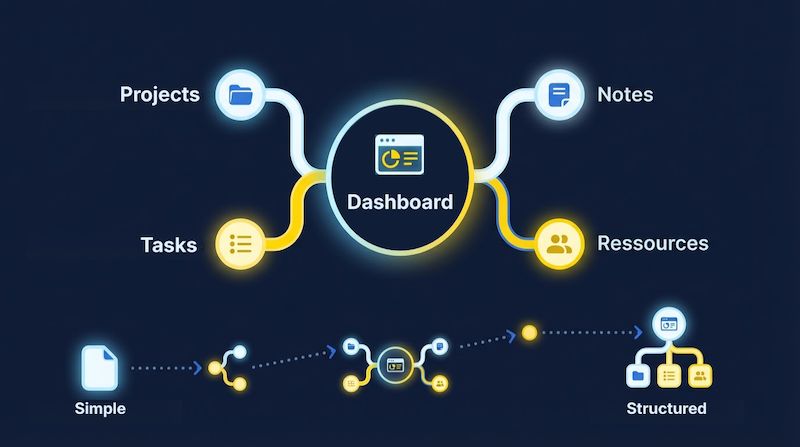
Create a central dashboard: after a few days, create a “Dashboard” page. Group your main pages, filtered views (today’s tasks), your goals. Put this page in favorites.
Explore templates: before creating from scratch, check if a template exists in the Notion gallery. My freebies also include several templates.
Don’t be afraid to experiment: you can move, modify, delete without risk. Cmd/Ctrl + Z undoes. Trash keeps your deleted pages (attention for a limited duration depending on your plan). Notion is made to be malleable.
Mistakes to Avoid
- Mistake #1: Wanting to do everything at once – Start small, test, adapt. Beautiful spaces are the result of months (years?) of building.
- Mistake #2: Copying someone else’s system – Get inspired, but build YOUR system adapted to your brain.
- Mistake #3: Spending more time organizing than doing – Notion makes you productive, but you could get lost in it.
- Mistake #4: Never using the mobile version – The mobile app is excellent for capturing quickly. Think about it when creating your pages.
Features to Discover Next
Once comfortable with the basics:
- Relations between databases: link one database to another. Create a real system. Link your tasks to your projects.
- Filters and sorts: in each view, filter to display only certain rows. Sort according to your criteria.
- Formulas: automatically calculate values. Number of days before deadline, progress percentage…
- Buttons: automate repetitive actions. Add a task with pre-filled properties, create a template page…
- Automations: configure Notion to execute actions automatically according to conditions.
- Notion Calendar & Mail: download Notion Calendar to see your databases with dates and your Google Calendar. And download Notion Mail to organize your emails with AI.
Your Next Steps
Join the community: there are several active French-speaking communities like my Notion community in Alsace or Notion en français (on Discord or Facebook).
Consult resources:
- YouTube tutorials
- Notion official documentation
- Blog articles like this one
To go further:
- My free templates
- My template Notion Level Up: 12 challenges to transform your workspace
- My coaching sessions to co-create your space
And welcome to the Notion community! 🚀

0 Comments